








This is a follow-along tutorial. Work through it top to bottom and you'll go from a fresh install to a captured HTTPS request that you have inspected, sent to Repeater, edited, and re-sent, all without leaving the terminal. Set aside about ten minutes.
Each step ends with a Checkpoint: what you should see before moving on. If something looks different, that line is where to stop and fix it.
Before you begin. Install gori and have a browser installed. You'll capture your own browsing, so pick a site you are authorized to test (your own app, a staging box, or a deliberately vulnerable practice target). The examples use a stable throwaway target,
example.com, for the parts that need an exact result.
1. Start gori
With no subcommand, gori opens the project picker. The proxy starts when you open a project:
gori
The first launch runs a short setup wizard (global bind, theme, and the Miss Ring mascot), then offers a guided UI tour. You can take the tour now or skip it and come back; this page covers the same ground against live traffic.
At the picker, select New project, enter a name, then press Enter twice (the description is optional). The guided tour returns you to this picker when it finishes on first launch.
To find which project captured something (a token, a host, an endpoint), press Ctrl-F at the picker and type it. gori searches the flows of every project by host and path, and by body text once you have typed three characters, then lists the hits under each project. Enter opens that project with the flow's detail showing. Esc stops a search that is still running, and closes the search once it has finished.
By default the proxy listens on 127.0.0.1:8070. Override it for a single run (a project's own bind still wins when set):
gori --listen 0.0.0.0 --port 8080
Checkpoint. Your project session is open on History. The tab bar shows Project, Target, History, …, and the top bar shows the proxy address, 127.0.0.1:8070.
2. Trust the CA and capture your first flow
To read HTTPS, the client has to trust gori's root certificate (generated on first run under ~/.gori/ca). The easiest route is a pre-trusted browser.
Option A: Open a pre-trusted browser (recommended)
Inside the TUI:
- Press
Ctrl-Pto open the command palette. - Type
browserand run Open browser. - Pick an installed browser (Chrome, Chromium, Brave, Edge, Firefox, …).
gori launches it with a throwaway profile that already trusts the CA and routes HTTP/HTTPS through the proxy. In that browser, visit a site (try https://example.com, then a site you're testing).
Firefox note. Auto-trusting the CA needs
certutil(NSS) onPATH. Without it, gori still sets the proxy but Firefox won't trust the CA, so HTTPS sites show a security warning. Either install it first (brew install nsson macOS,apt install libnss3-toolson Debian/Ubuntu,dnf install nss-toolson Fedora) and reopen the browser, or trust the CA by hand in that same window: openabout:preferences#privacy, click View Certificates, go to Authorities, then Import the filegori caprints.
Option B: Point any client yourself
Print the CA path and import that file into your system or browser trust store as a trusted root CA:
gori ca
Then set the client's HTTP and HTTPS proxy to 127.0.0.1:8070. Quick smoke test from another terminal:
curl -x http://127.0.0.1:8070 https://example.com
gori mints per-host leaf certificates from the root on demand, so you trust the root only once.
For command-line tools there is a shortcut: gori run shell (or Open shell in the palette) starts a shell whose curl, git, Python, Go and Node traffic already goes through the running gori and trusts its CA, without touching OS settings. gori run shell -- curl https://example.com runs one command that way. See gori run shell.
gori's private key is a secret for this machine only: it is written with
0600permissions and never leaves the machine. Rotate it from the palette (Regenerate CA certificate) only when you mean to invalidate every prior trust.
Option C: Install the CA on a phone or tablet
A phone can't read the CA off your filesystem, so gori serves it over the network instead.
-
Bind the proxy so the device can reach it, and note your machine's LAN IP:
gori --listen 0.0.0.0 --port 8070 -
On the device, set the WiFi HTTP and HTTPS proxy to
<your-LAN-IP>:8070. -
Open a browser there and go to
http://gori.proxy/(http://gori/works too). -
Download the certificate and trust it. On iOS that is two steps: install the profile, then enable it under Settings → General → About → Certificate Trust Settings. On Android, install it under Settings → Security → Encryption & credentials → Install a certificate → CA certificate.
gori.proxy is a reserved name gori answers for itself, so it works once the proxy is configured and never reaches the network. If you'd rather not configure the proxy first, browse straight to http://<your-LAN-IP>:8070/ instead and you'll get the same page.
Option D: Set up an Android emulator over adb
With adb on PATH (or ANDROID_HOME set) and an emulator running or a device plugged in with USB debugging on, gori does the setup for you. The proxy stays on loopback: adb reverse carries the device's traffic to it.
gori run android setup --dry-run   # print the adb commands first
gori run android setup --system    # emulator without Play Store, or a rooted device
gori run android undo              # clear the proxy and the mapping
--system puts gori's root in the system store as root, so apps trust it without a network security config. It lasts until the device reboots. It needs root, and Android 14+ (API 34) is not supported yet. The default, --user, pushes the certificate to /sdcard/Download/gori-ca.crt and opens Security settings to install it as a CA certificate. Apps targeting API 24+ only trust a user CA if their network security config opts in. In the TUI, the palette's Set up Android device runs the same steps. See gori run android.
Checkpoint. Switch to History (press 3). You should see at least one row: your GET https://example.com/ request with a 200 status. If History is empty, capture isn't reaching gori: recheck the proxy setting (Option B) or use Open browser (Option A).
3. Learn the two discovery surfaces
You don't need to memorize tab-specific keys. Two keys reach every action:
| Surface | Key | What it is for |
|---|---|---|
| Space menu | Space |
What you do most in the pane you are in (a History row, a flow's detail, the Repeater editor, …), one letter per action |
| Command palette | Ctrl-P |
Every action, found by typing its name: the pane's own actions first, then app-wide ones such as settings and Open browser |
Both show each action's shortcut beside it, so opening them is also how you learn the keys. Try it now on the flow you just captured:
- In History, press
↓to select your flow, thenSpace. The letter on the left of a row runs it; the key on the right (^Rbeside Repeater flow) does the same without the menu. A row marked›, such as>Send flow to…, opens a second card;Escsteps back. PressEscuntil the menu closes. - Press
Ctrl-Pand typesend. The History actions come first underTHIS TAB, each with the key or menu path that reaches it (␣ > cmeansSpace,>,c). PressEsc.
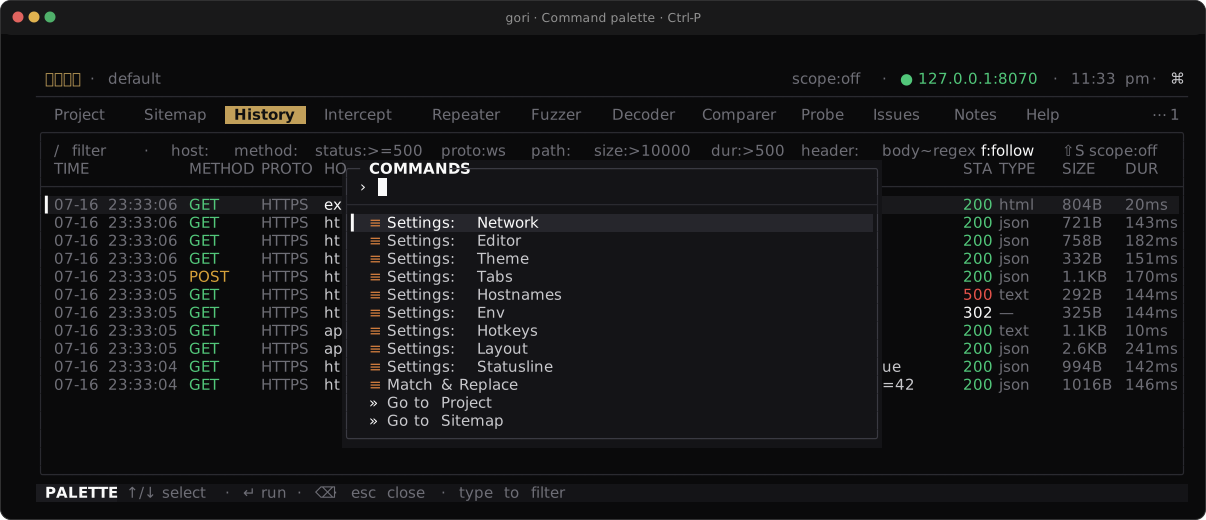
send typed on History: the tab's own actions first, each with the shorter route to it, then app-wide commands.Space Menu & Palette covers both in depth, including the Z Display… and P Protocol… cards and the actions that only the palette lists.
Three global toggles are worth knowing from the start:
| Key | Action |
|---|---|
c |
Toggle capture (off = the proxy stops listening and nothing is recorded) |
i |
Toggle intercept (hold matching requests to forward / drop / edit) |
s |
Toggle the scope lens (filter views to in-scope traffic) |
4. Move around the TUI
gori is a row of tabs. The default order starts Project → Target → History → Intercept → Repeater → Fuzzer → …
| Key | Action |
|---|---|
[ / ] |
Previous / next tab |
1-9 |
Jump to the Nth visible tab (with defaults, History is 3) |
Enter / ↓ |
Enter the tab body from the tab bar |
Esc |
Pop focus back toward the tab bar |
Tab / Shift-Tab |
Move focus between the tab bar and panes |
Mouse works when enabled (Preferences → Editor & Keys → Mouse): click a tab, click a row to select, click again to open. The Help tab (?) is the full key cheatsheet inside the app.
5. Read a flow in History
Make sure History is active (3). Every request/response is a flow: start line, headers, body (the first 2 MiB by default), plus HTTP/2 frames, WebSocket messages, and decoded JWT / SAML / GraphQL when present.
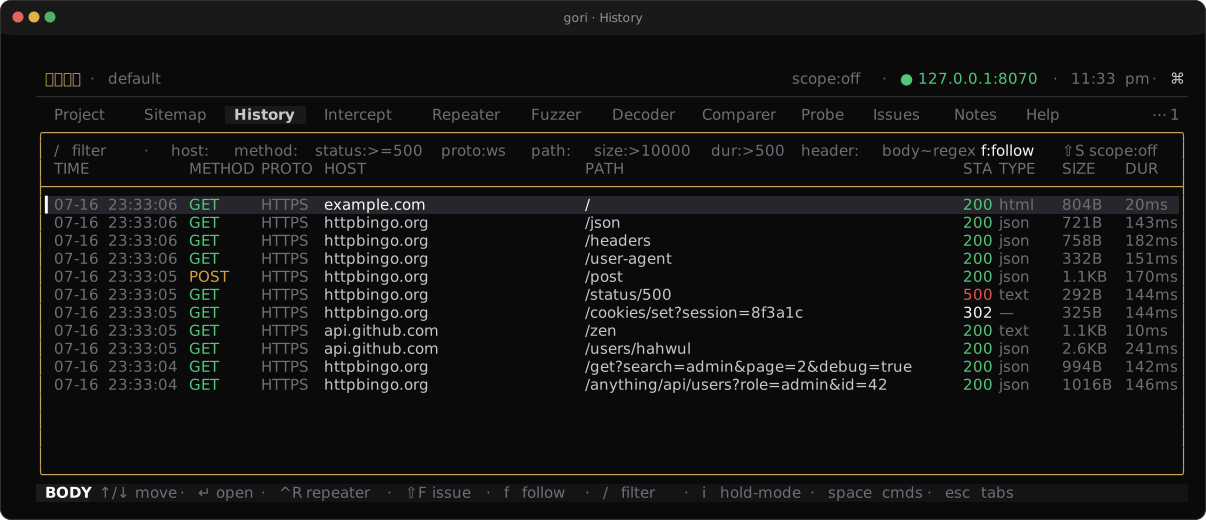
Try each of these:
| Key | Action |
|---|---|
↑ / ↓ (or j / k) |
Move the selection |
Enter |
Open request/response detail |
/ |
Filter with the query language |
Space Z f |
Toggle follow-newest (tail) |
y |
Copy the selected flow |
Press / and type a filter, then Enter:
host:example.com
History narrows to that host. Clear the filter (/, erase, Enter) to see everything again. A few more to try later:
status:5xx
method:POST body:password
Now select your example.com flow and press Enter. In the detail view, scroll with ↑ / ↓, copy with y, and toggle Ctrl-X / b / p for hex / whitespace / pretty bodies. Esc returns to the list.
Checkpoint. You can filter History down to one host and open a flow to read its full request and response.
6. Send it to Repeater and re-send (the core loop)
This is the loop you'll spend most of your time in: take a captured request, change something, send it again, and compare.
-
In History, select your
example.comflow. -
Press
Ctrl-R. gori copies it into the Repeater tab and switches you there. -
Press
Enterorion the request pane to edit (INS mode). Change something small, for example add a header line:X-Gori-Test: 1 -
Press
Escto leave edit mode, thenCtrl-Rto send.Copying while you edit:
Shift+arrows select in both modes, but the copy key differs. In READ it isy; in INSyis a literal character, and typing it over a selection replaces the selection, so useCtrl-Y.Escalso carries the selection out of INS, soEscthenyworks too. If a keystroke does eat a selection,Ctrl-Zputs it back in one step. -
The response, its timing, and a diff against the previous reply appear on the right.
Tabcycles target → request → response.
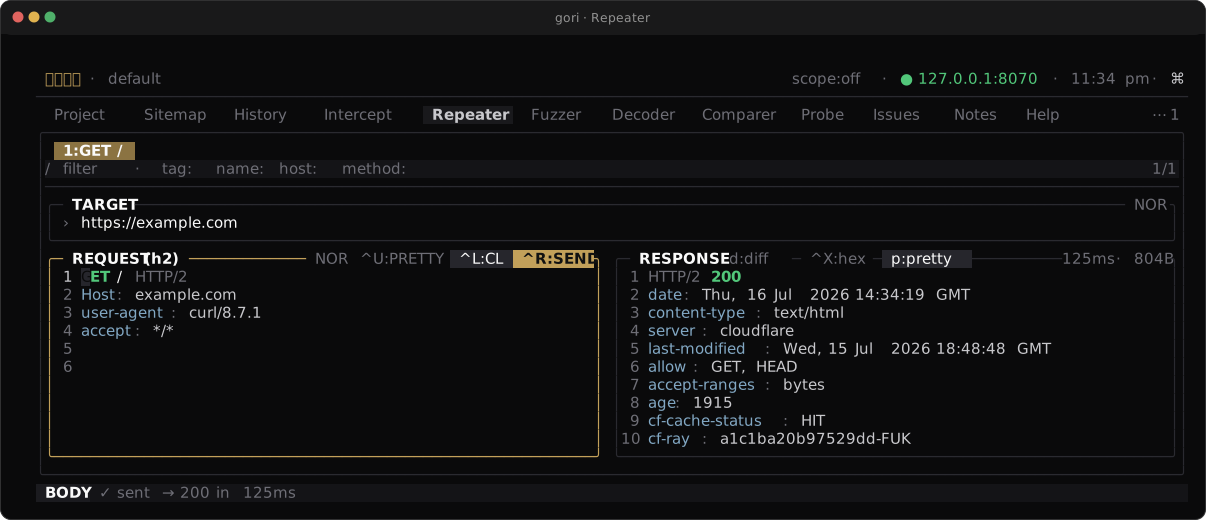
Checkpoint. The Repeater status line reads something like sent → 200 in … ms, and you can re-send with Ctrl-R as many times as you like. That is the full capture → inspect → replay loop.
7. Where to go next
You now have the core loop. From here, the Playbooks walk one workflow at a time (scope, map, intercept, fuzz, and report), each run end to end with checkpoints. A few first directions, also covered in depth in the Guide:
- Fuzz a parameter. Select a flow, press
Shift-Ito send it to the Fuzzer, mark a position (Ctrl-Aauto-marks common params), attach a wordlist, andCtrl-Rto run. See Repeater & Fuzzer. - Intercept and edit in flight. Press
ito hold matching requests and forward, drop, or modify them before they continue. See Proxy & History. - Track what you find. Turn anything worth reporting into an Issue with
Shift-F, and read passive findings on the Probe tab as you browse. See Scanning & Issues.
Day-1 key map
Keep this table nearby until the chords stick:
| Key | Where | Action |
|---|---|---|
Space |
Focused pane | Space menu: this pane's actions, one letter each |
Ctrl-P |
Anywhere | Command palette: type any action's name |
? |
Anywhere | Help: the full key sheet |
Ctrl-, |
Anywhere | Preferences (all settings in one modal) |
c / i / s |
Anywhere | Capture / intercept / scope lens |
[ ] · 1-9 |
Anywhere | Switch tabs |
/ |
History | Query-language filter |
Enter |
History | Open flow detail |
Ctrl-R |
History | → Repeater |
Shift-I |
History | → Fuzzer |
> |
History | Send flow to… any tool (> c → Comparer) |
Ctrl-R |
Repeater / Fuzzer | Send request / run fuzz |
Esc |
Most places | Back out one level |
First-run wizard
Re-run the guided setup (global proxy bind default, then theme, then Miss Ring) at any time:
gori wizard
The listen IP defaults to 127.0.0.1 (this computer only); 0.0.0.0 lets other devices reach the proxy. The first Enter moves from IP to port, and the next continues. The choice becomes the shared default in settings.json; a project can pin a different address from its Project tab. If the port is busy, Enter again keeps it. Esc twice skips the wizard.
The final Review step recaps what you picked, names your editor keyset and where to change it (the wizard never sets it), and carries one editable row: Shortcuts, which ←/→ flips between Ctrl and Option (⌥) for gori's built-in chord family (^P ^N ^W ^1-9). Choosing Option adds ⌥ aliases rather than replacing Ctrl, which is useful when your terminal or multiplexer never delivers the Ctrl form. See Command modifier for the macOS Option-as-Meta requirement.
Guided UI tour
A mock-UI walkthrough of tab/pane navigation, the space menu (including its second cards), the command palette's search, READ/INS edit mode, then the traffic itself: where to point a client and how to trust the CA, the capture switch, and intercept. It is safe to run without a live proxy session. Each lesson shows a short demo and asks you to try the real key; a hands-on sandbox covers the first four moves, and the tour ends with Help and quitting, then a first-session checklist. The mock menus use the same letters and keys as your install, rebinds included.
gori tutorial
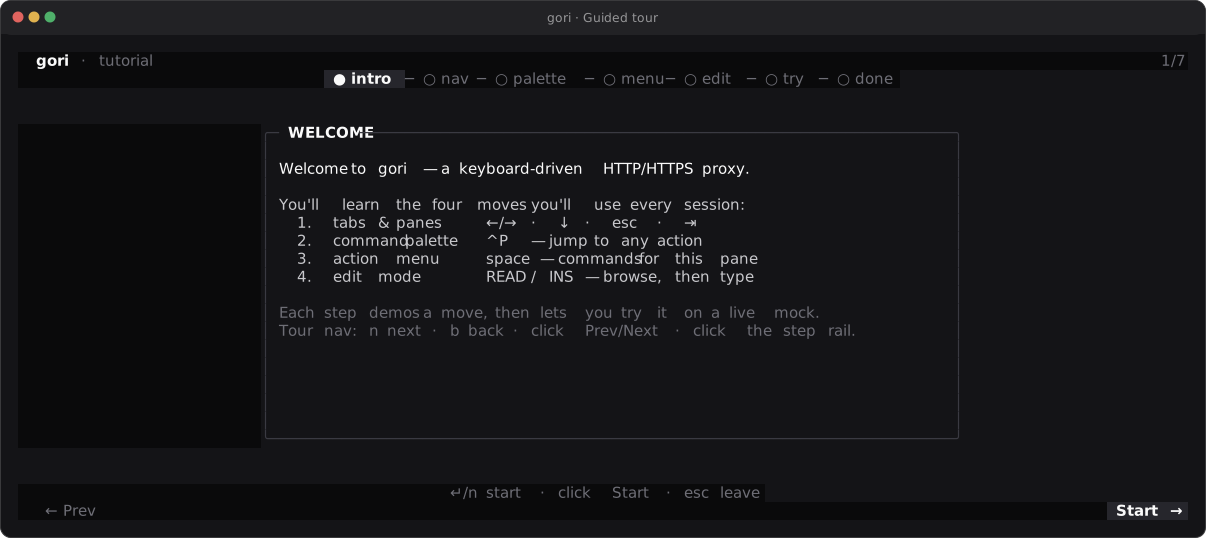
It is also offered at the end of the first-run wizard, and from inside a session as the palette command Guided tour (Ctrl-P). Its last card tells you whether finishing leads to the project picker, a --db session, the shell, or your current session.
Next Steps
- Configuration: storage layout, network settings, and the CA
- Proxy & History: capture, intercept, scope, import, match & replace
- Repeater & Fuzzer: the testing workbench and env tokens
- Query Language: full filter syntax
- Space Menu & Palette: find any action without memorizing keys
- Hotkeys: rebind any of the chords above